How to Pay for Kimi
Kimi's developer, Moonshot AI, has bet heavily on an agentic way of working — instead of answering in a single message, the model plans its own steps, looks up the data it needs, processes files, and assembles the result as a finished presentation, website, or report. The regular chat is still there too, handling text, code, and document analysis, and support for images and a large context window lets you work with bulky material without splitting it into pieces by hand. You can use Kimi from the browser, the mobile app, dedicated tools for agentic tasks and code, and developers get an API.
What paid tiers Kimi offers
There's a separate limit on the coding tool — it has its own caps for a five-hour and a weekly window, independent of your overall credit balance on the plan. Before subscribing, it's worth trying the free tier and getting a sense of which features burn through the limit fastest in your particular use case.
How Kimi subscription billing works
The subscription charges automatically from your linked payment method every month or year, depending on the billing period you picked when signing up. The payment method gets attached to your Kimi account the first time you subscribe — a card directly on the site, through Apple ID for an in-app purchase on iPhone, or through your Google account for a purchase on Android — and from then on, that same method charges the money at every renewal without you re-entering the details.
You can manage the subscription afterward in your account settings on the site, under the subscription info section, or, if you paid through an app store, through subscription management in Apple ID or Google Play.
What payment methods you can use for Kimi
A bank card
This option settles the question once and for all rather than for a single payment — the card works at every renewal with no extra action, for as long as the account itself stays active. That said, crypto holders can't spend their digital funds this way either, since it's a card payment.
A virtual card
What matters here isn't how fast you get the card, but one specific detail — the card needs to support repeat charges, not just a single payment, or the subscription will renew fine the first month and then fail the second. It's worth checking that before you top it up, not after access to Kimi unexpectedly disappears. Getting the card itself really is simple — the details are issued remotely, with no branch visit and none of the paperwork that opening a full account in another country would require.
Using an intermediary
A third party takes your currency and pays for Kimi from their own card — it's fast and doesn't require a payment instrument of your own, but it adds a fee on top of the official subscription price, and the intermediary sets the conversion rate. That can be convenient for a one-off payment, but it's inconvenient for regular auto-renewal — you'd have to go back to the intermediary every single period.
How to use Mirocard to pay for Kimi with cryptocurrency
Mirocard issues a virtual Visa or Mastercard built for exactly this kind of task — the card supports repeat charges, so a Kimi subscription renews itself with no trouble in the second month. At checkout, the card goes through as a regular international card, whether you're paying directly on the site or through Apple ID or Google Play.
Topping up works as a direct transfer from a crypto wallet to the card's details — no stop at an exchange or exchanger in between. The amount shows up on the balance already in the subscription's currency, usually within a few minutes of the transfer.
Issuing the card costs $5 as a one-time fee, and every top-up after that carries a 4% charge — there are no other service fees. The full setup process, step by step, is covered in a separate article on issuing a Mirocard virtual card — here's what to do next once the card is ready.
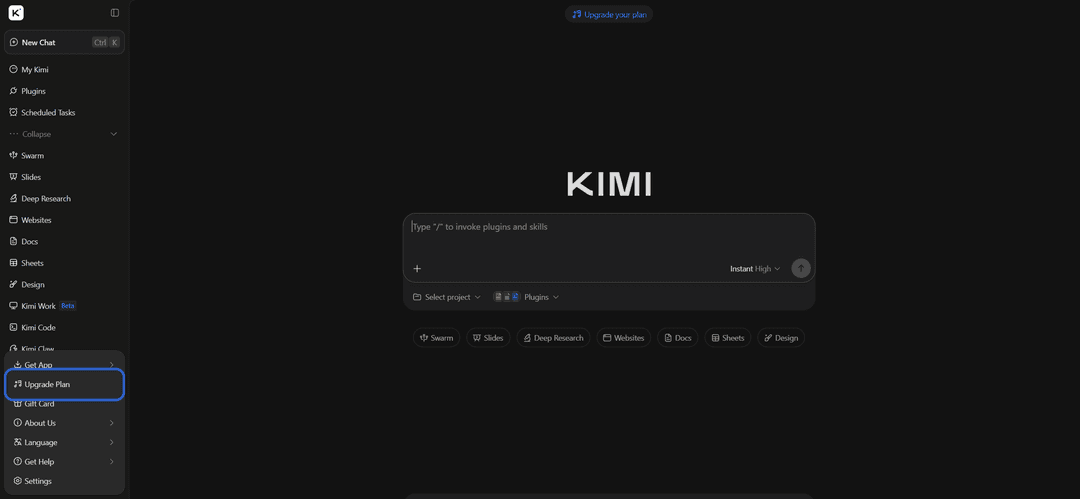
Go to the Kimi site and click "Upgrade Plan."
Next, pick a plan — from Moderato to Vivace, depending on how many credits you need a month. Choose the billing period, monthly or annual, and click "Join Waitlist" under the tier you picked.
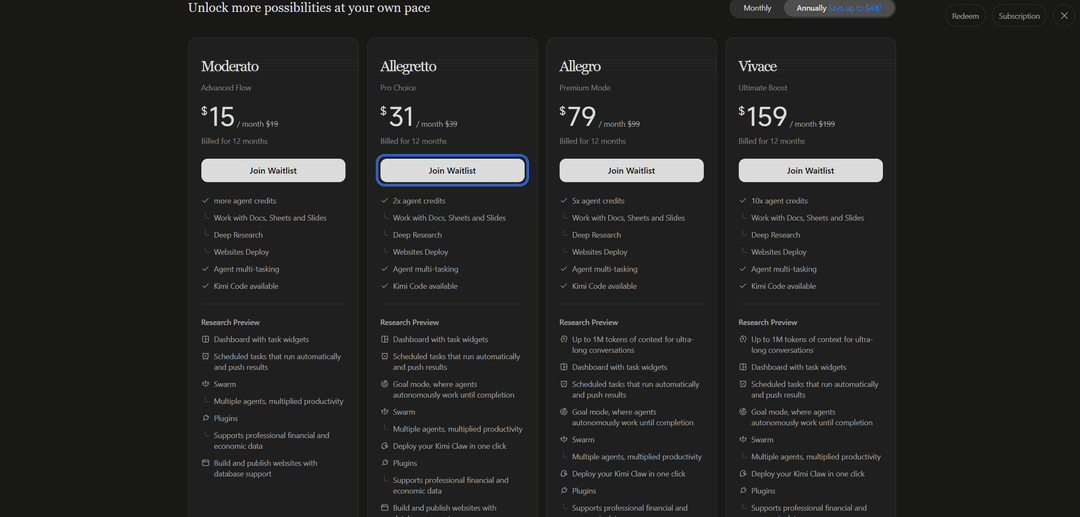
A notification will arrive later at your linked email or phone number once your turn comes up and the subscription slot unlocks.
You'll need to choose card payment and fill in three fields — the Mirocard's number, expiration date, and security code. Check the amount and billing period in the final confirmation window and confirm the payment — access to the tier opens right away.
What to keep in mind with auto-renewal
The main risk isn't that money will be charged unexpectedly — it's the opposite: that it won't be charged on time, and access to paid features will temporarily disappear. To avoid that, top up the card with some buffer a few days before the renewal date rather than right on the day — the charge sometimes goes through a day earlier than the expected date.
The second thing to watch is whether auto-renewal is actually still on — you might have turned it off earlier yourself, or it could reset when you change payment methods, and then the subscription just quietly ends with no warning. You can check that, along with the exact date of the next charge, in the subscription settings on Kimi's site, or, if you subscribed through an app store, in Apple ID or Google Play's subscription management.